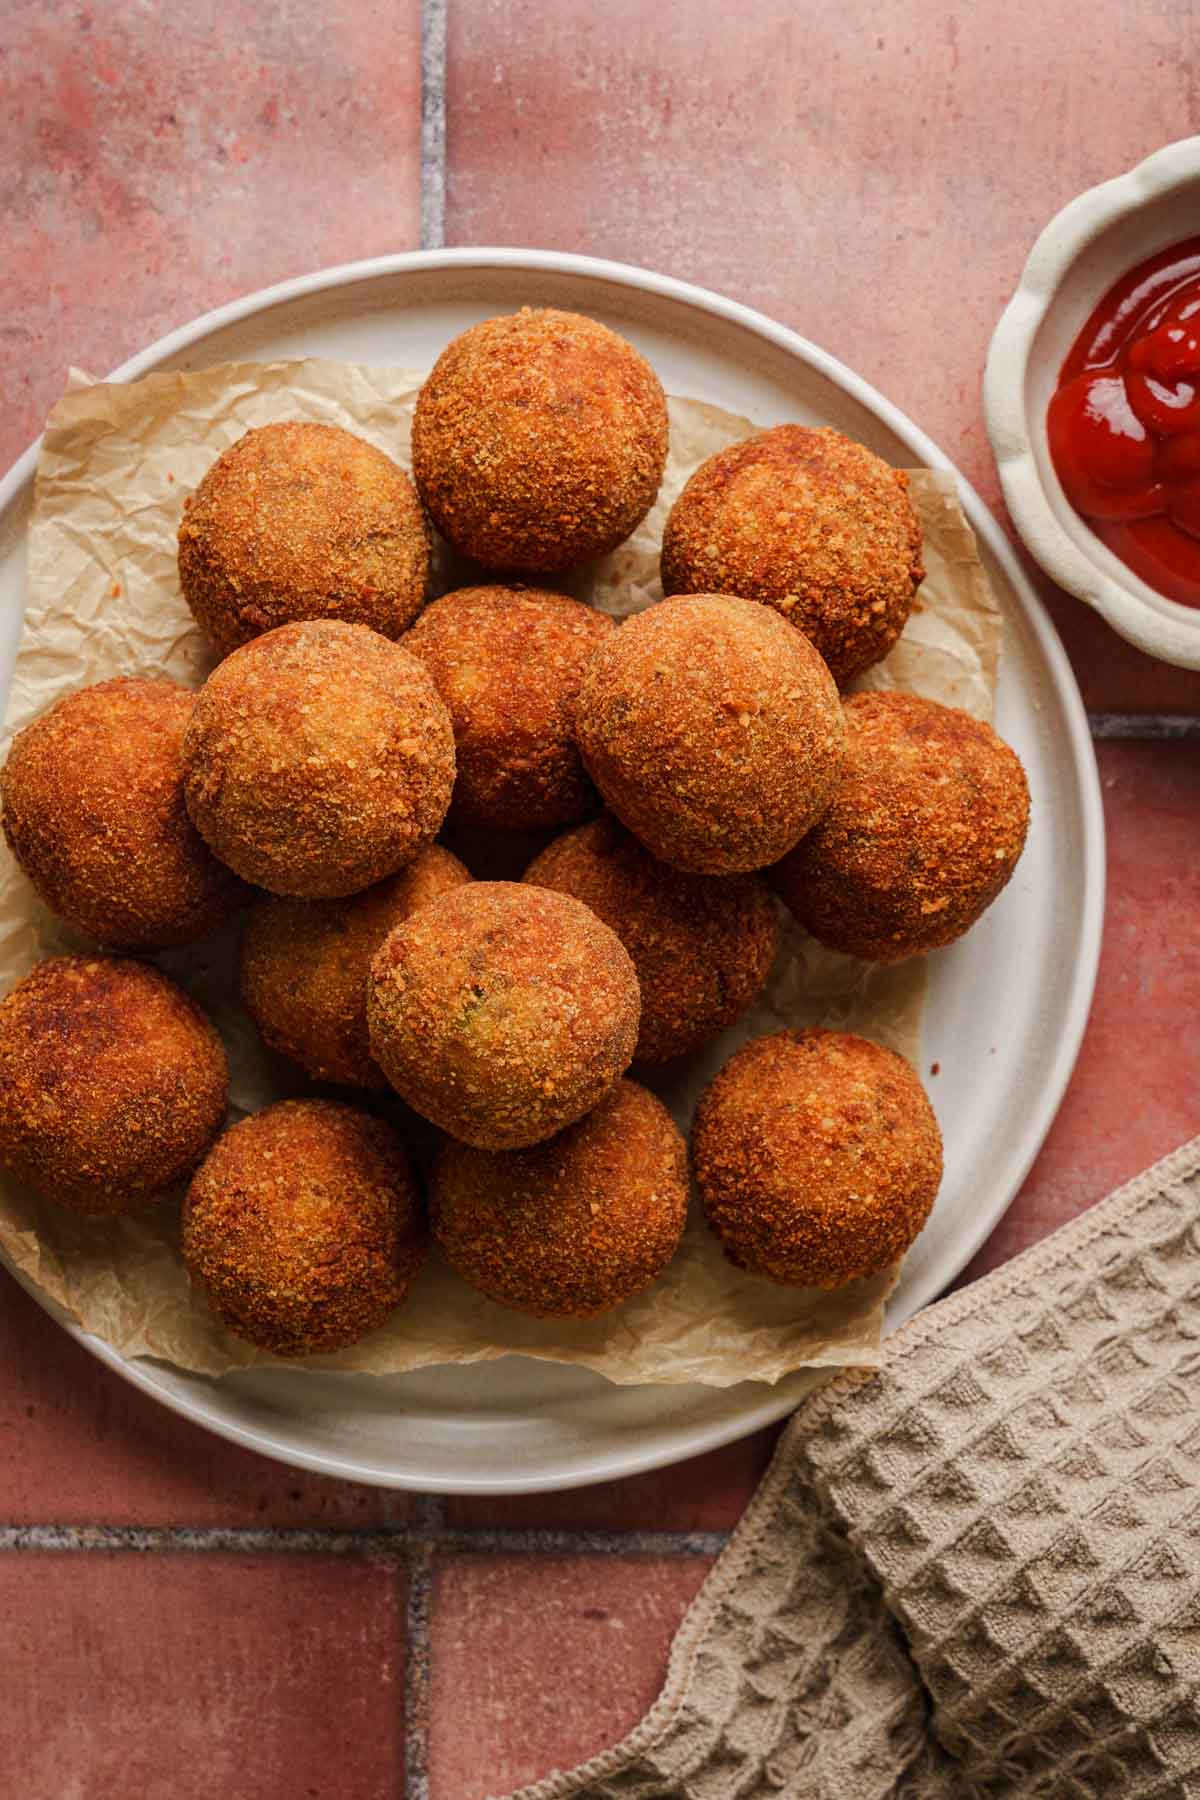
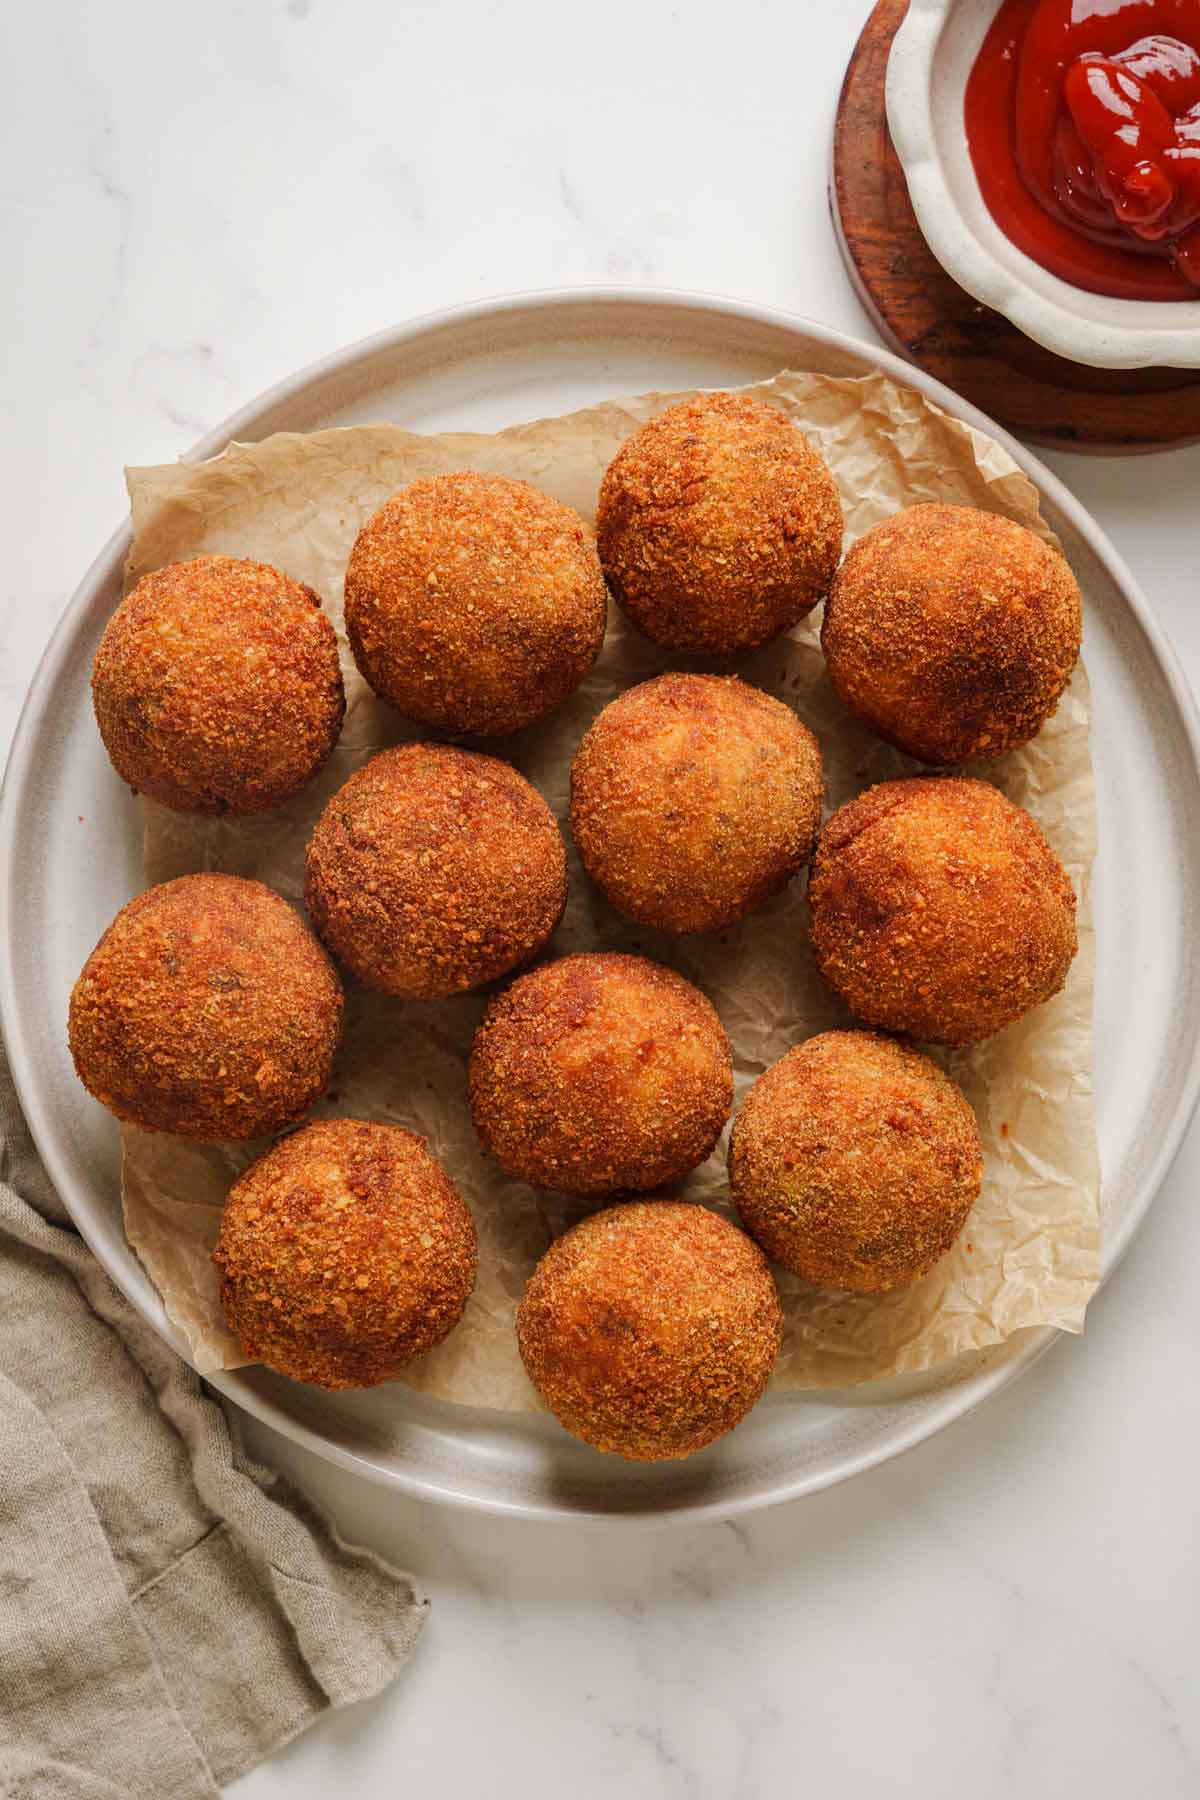
Sri Lankan Fish Cutlets
A popular snack in Sri Lanka, fish cutlets are crispy breaded balls with a spiced fish and potato filling that’s super addictive. I’ll show you to how to fry fish cutlets that doesn’t crack or fall apart. And if you prefer it lighter or healthy, I got you covered with an Air Fryer fish cutlet version.
Sri Lankan Fish Cutlets
Sri Lankan fish cutlets are what the rest of the world would call croquettes. They’re made with canned fish – usually mackerel or tuna – mixed with mashed potatoes and spices, then coated in breadcrumbs and deep fried until golden.
Fish cutlets along with my Sri Lankan Chicken Patties are called “short eats” – bite-sized savory snacks you’ll find at served in platters at parties, gatherings, or any roadside shops for a quick bite. These are easy to make so growing up my family would make it for tea time or iftar time during Ramadan.
Most beginner batches of fish cutlet end up cracked, soggy, or falling apart before they even hit the plate. I know because I’ve had my fair share of failures. That’s exactly what this post is here to fix.
I’ve made this recipe more times than I can count, and I’ve tested every variable myself. I’m sharing not just the recipe but everything I’ve personally figured out – through real batches and real failures – to help your cutlets come out golden and intact every single time.
Two Ways to Make the Filling
There are actually two camps when it comes to making fish cutlet filling.
Some people cook the filling first – sauteing the aromatics, adding the fish, folding in the mashed potato, and cooking it all together until it’s dry and fragrant. That’s my method, and it’s what this recipe uses.
The other camp keeps it simple – they just mix the canned fish and mashed potato together, season it, and shape it straight away. It’s quicker and it works, but I personally find the cooked version gives a much better result.
Ingredients and Notes
*Scroll down for the full recipe card with ingredients and measurements.
For the filling
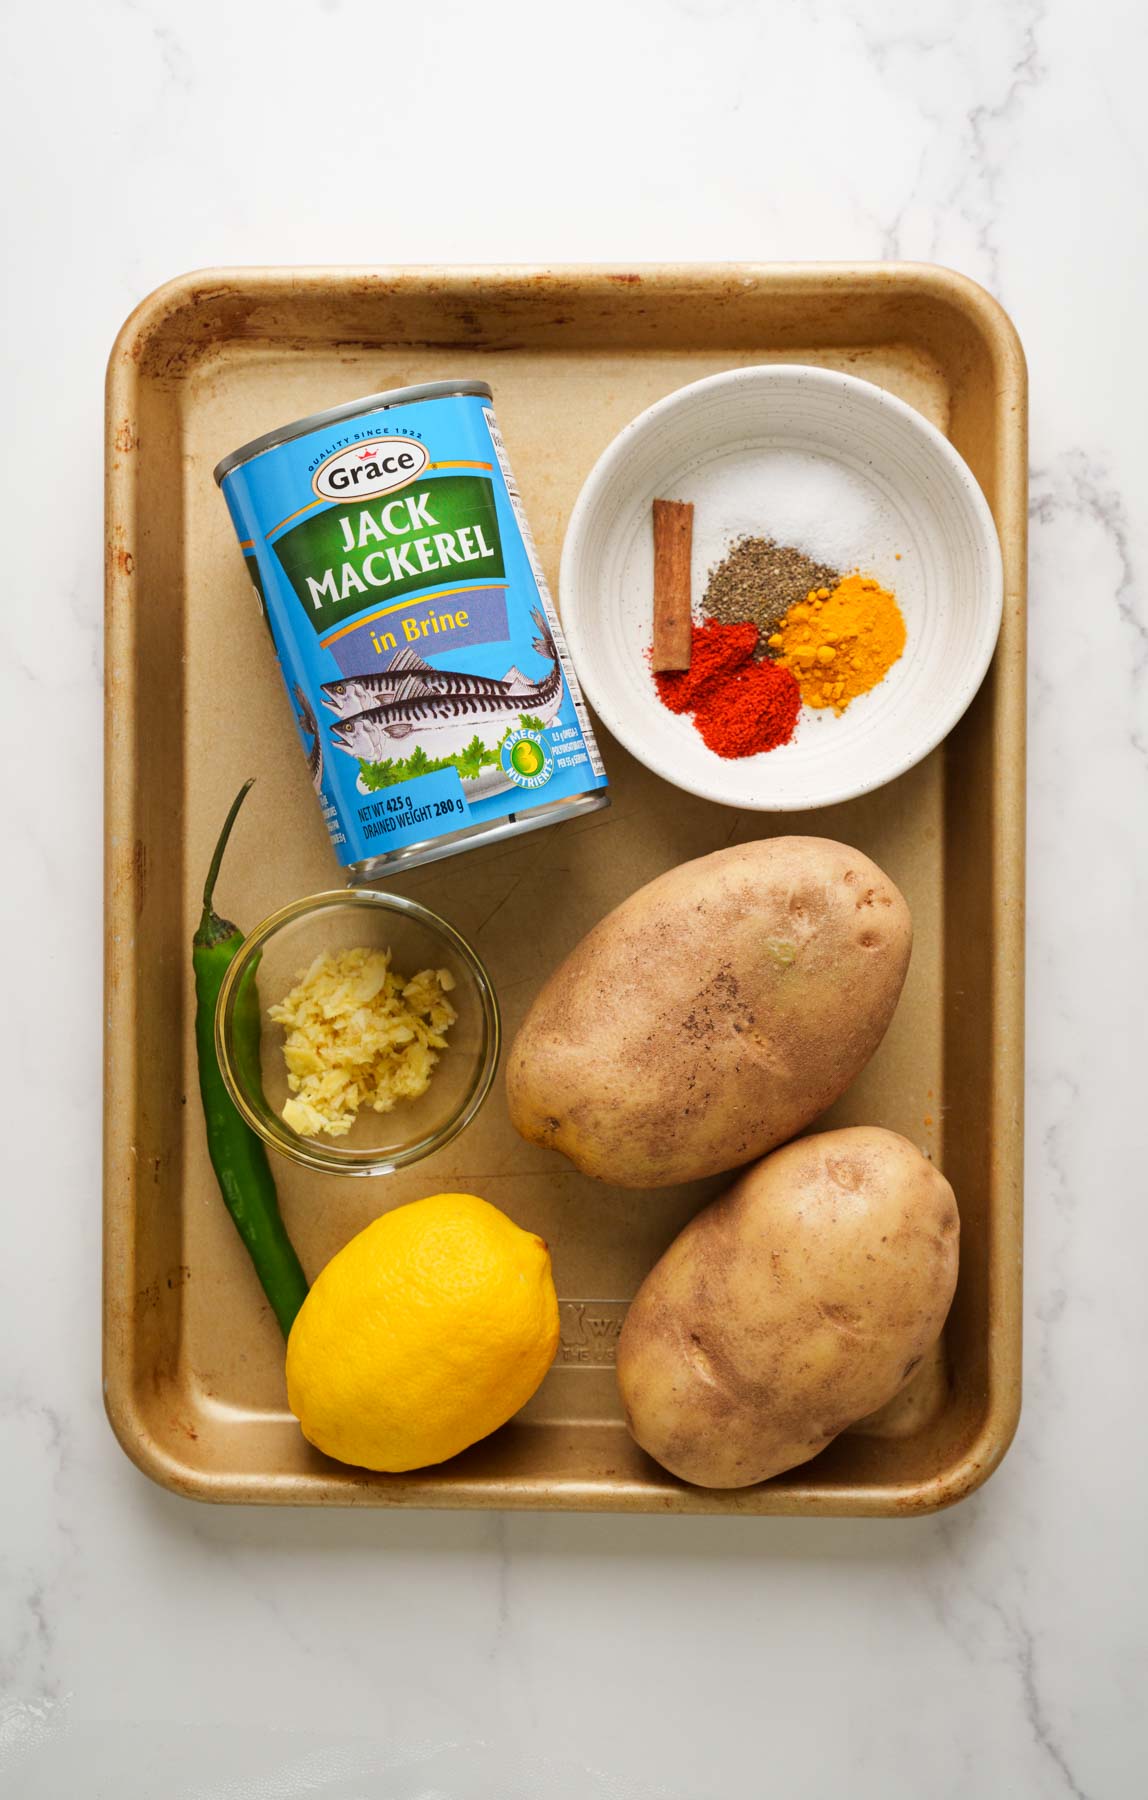
- Canned mackerel – Canned tuna works just as well if you prefer a milder taste. Drain the liquid completely and remove any large bones and the slimy dark skin before using.
- Potatoes – These are your binding agent. Don’t use waxy potatoes – starchy varieties like Russet or Maris Piper mash up smoother and hold the filling together better.
- Onion – Chop them finely. Small pieces are one of the keys to cutlets that don’t crack.
- Garlic and fresh ginger, minced – Use my homemade ginger garlic paste or store-bought if you’re short on time.
- Green chillies – Adjust to your heat preference, or remove the seeds for a milder kick.
- Chilli powder
- Turmeric powder
- Freshly ground black pepper – Freshly ground makes a real difference here. Pre-ground pepper is fine but fresh is better.
- Salt – Taste and adjust at the end. Remember that canned fish already carries some salt, so go easy at first.
- Lemon or lime juice – Brightens everything up and balances the spice.
For the Breading
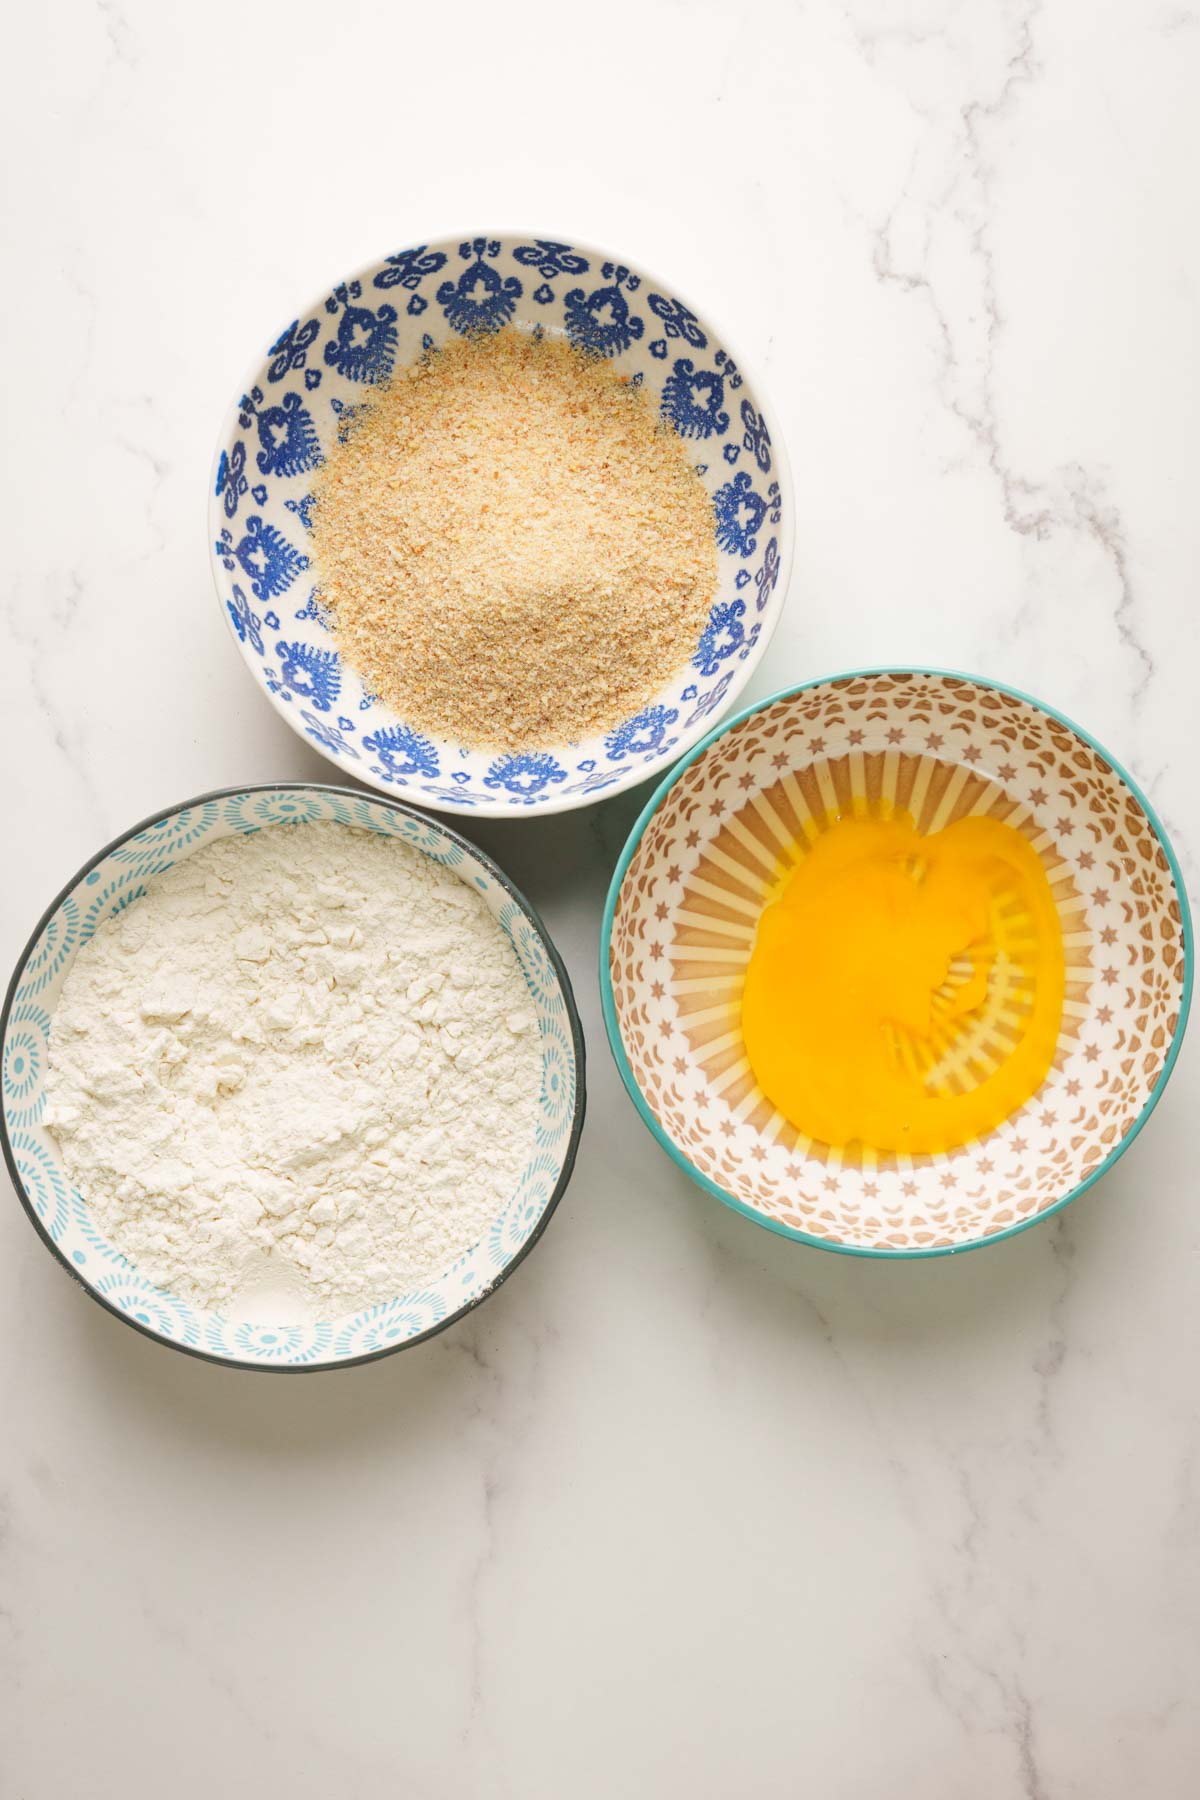
- Plain flour – Just enough to lightly dust each ball.
- Eggs, lightly beaten
- Breadcrumbs – Use the regular breadcrumbs. I’m not a fan of panko breadcrumbs for cutlets because we never use it in cutlets.
- Oil for frying – Use a neutral oil with a high smoke point. Vegetable, canola, or sunflower oil all work well.
How to Make Sri Lankan Fish Cutlets
*Scroll down for the full recipe card for ingredients and measurements.
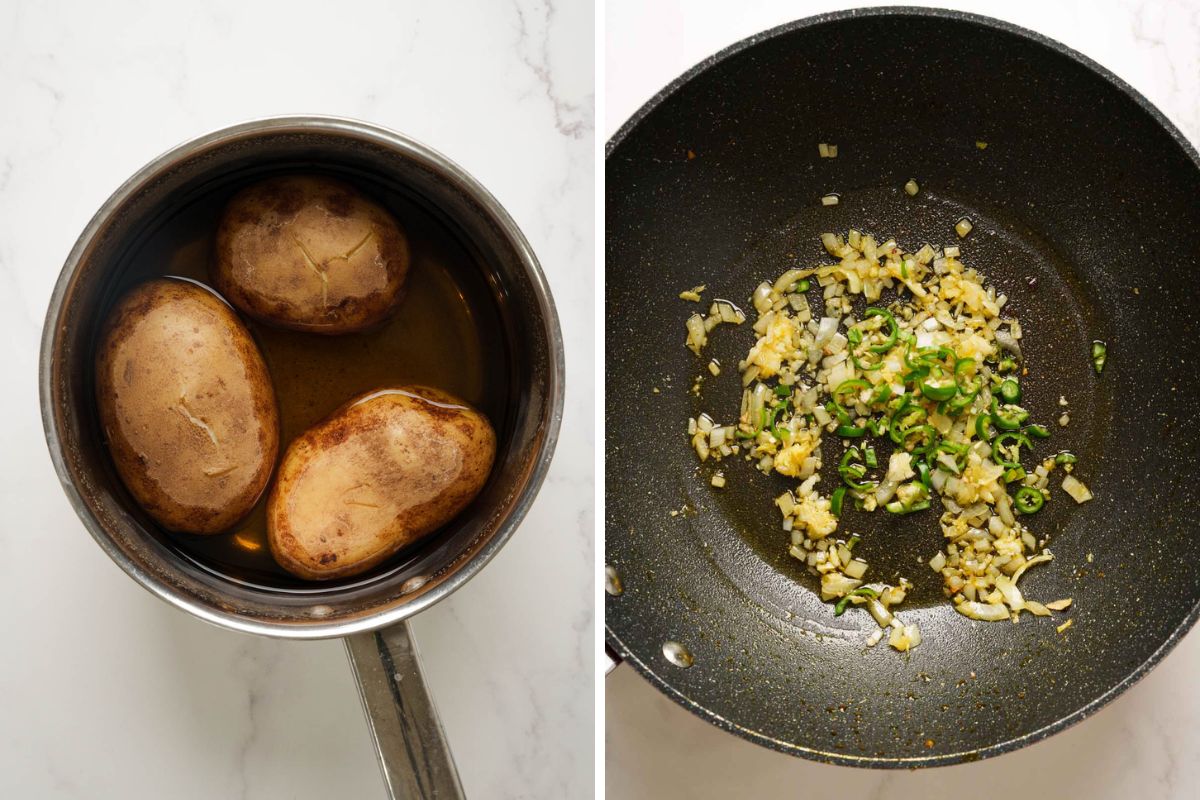
Step 1 – Boil and Dry Your Potatoes
Boil potatoes in salted water until just fork-tender, then drain immediately. Leave them uncovered for at least 10 minutes on the stove to steam dry before mashing. Don’t turn on the heat. Let it dry on residual heat from the stove. Just plain mash. Wet potatoes = wet filling = cracked cutlets.
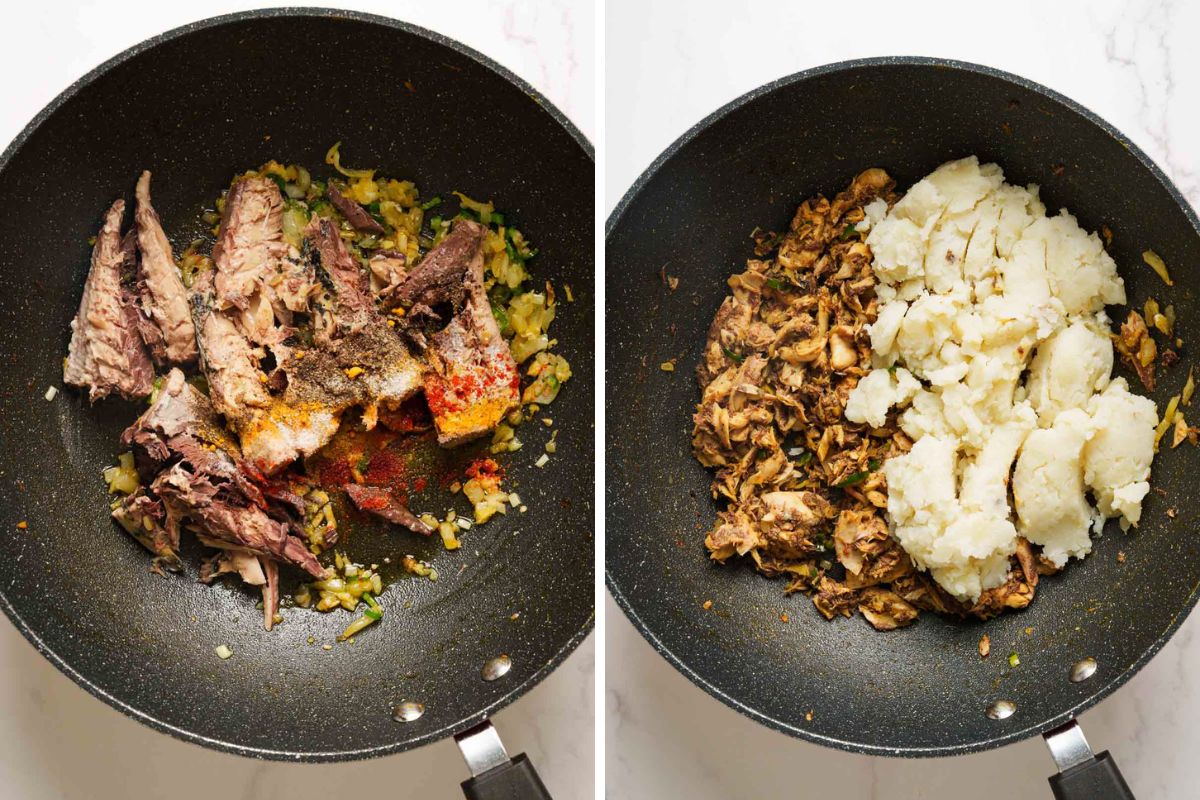
Step 2 – Prep and Cook the Filling
Drain and clean the canned mackerel, removing any large bones and dark skin. Saute onion, ginger, and garlic until soft, add the mackerel and spices, then fold in the cooled mashed potato. Cook the mixture for an extra minute or two until it looks dry and cohesive. Cool completely before shaping.
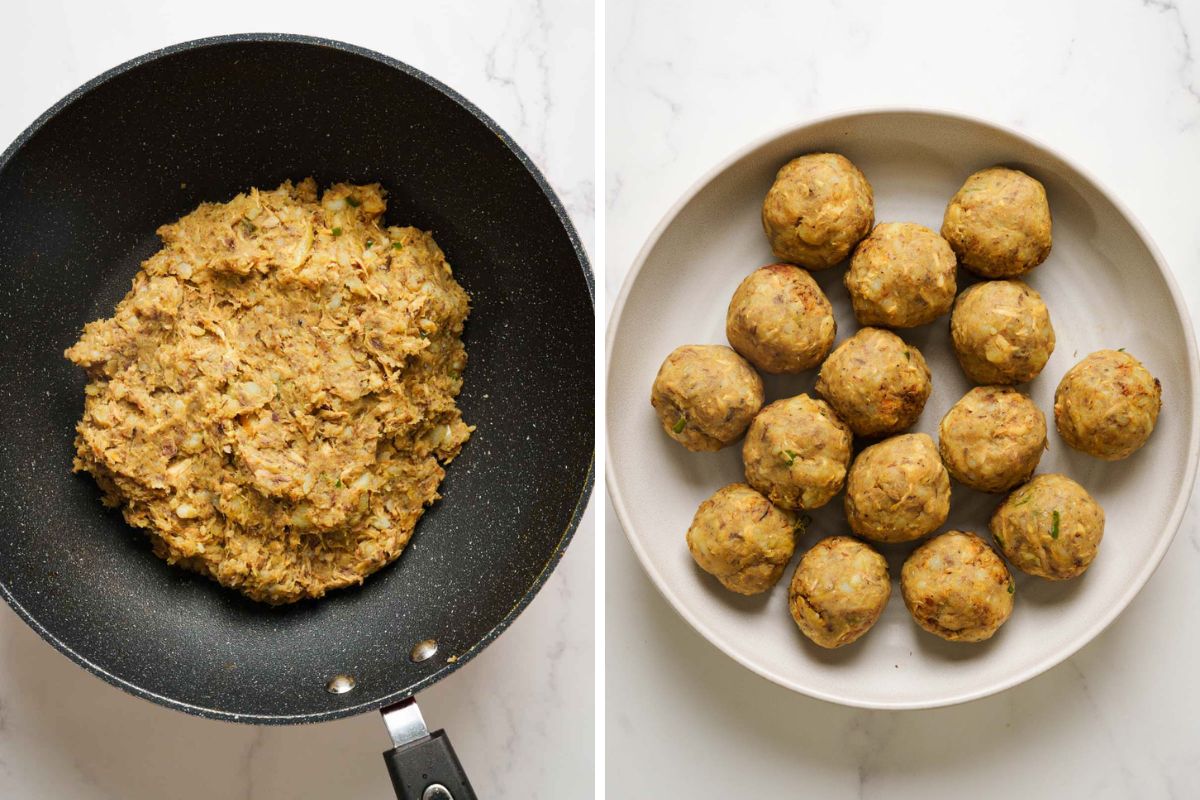
Step 3 – Shape, Coat, and Chill
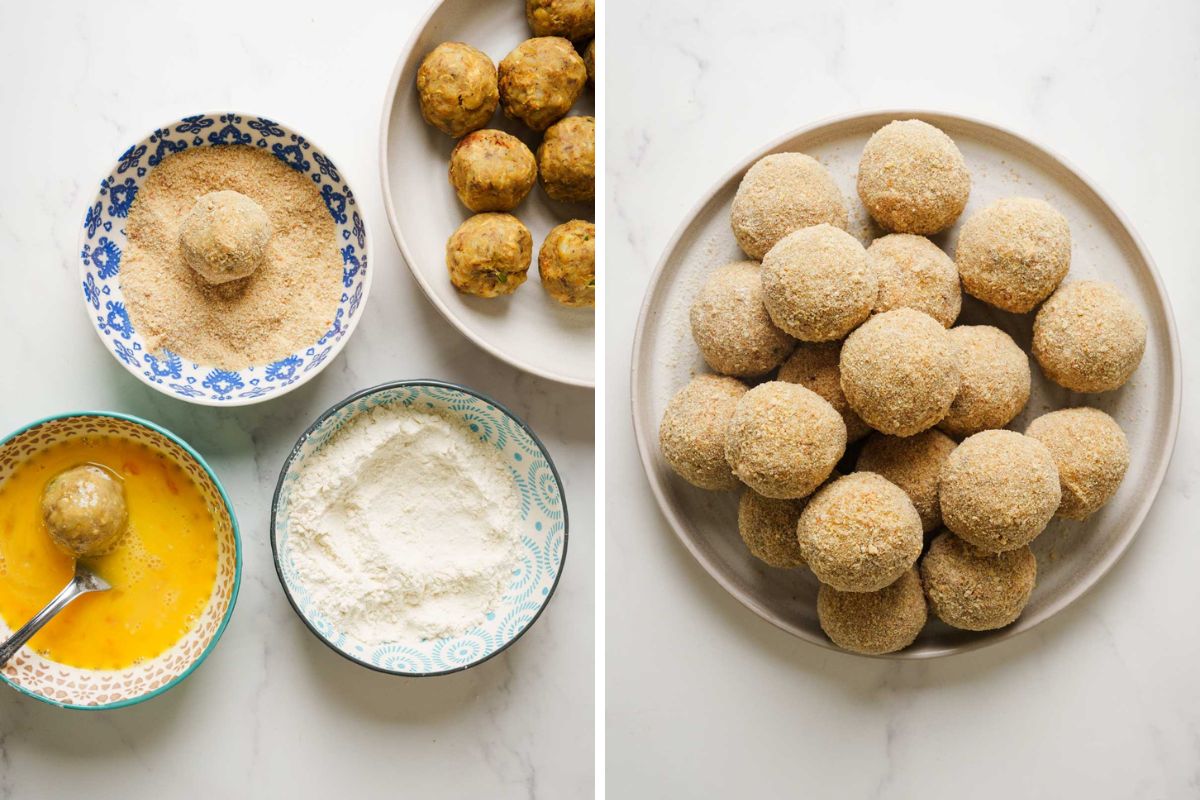
Roll the cooled filling into firm, evenly-sized balls. Coat each one lightly in flour, beaten egg, and breadcrumbs – pressing firmly so there are no gaps. For extra crack protection, double coat through the egg and breadcrumbs a second time. Then put the whole tray in the fridge for 10 minutes before frying.
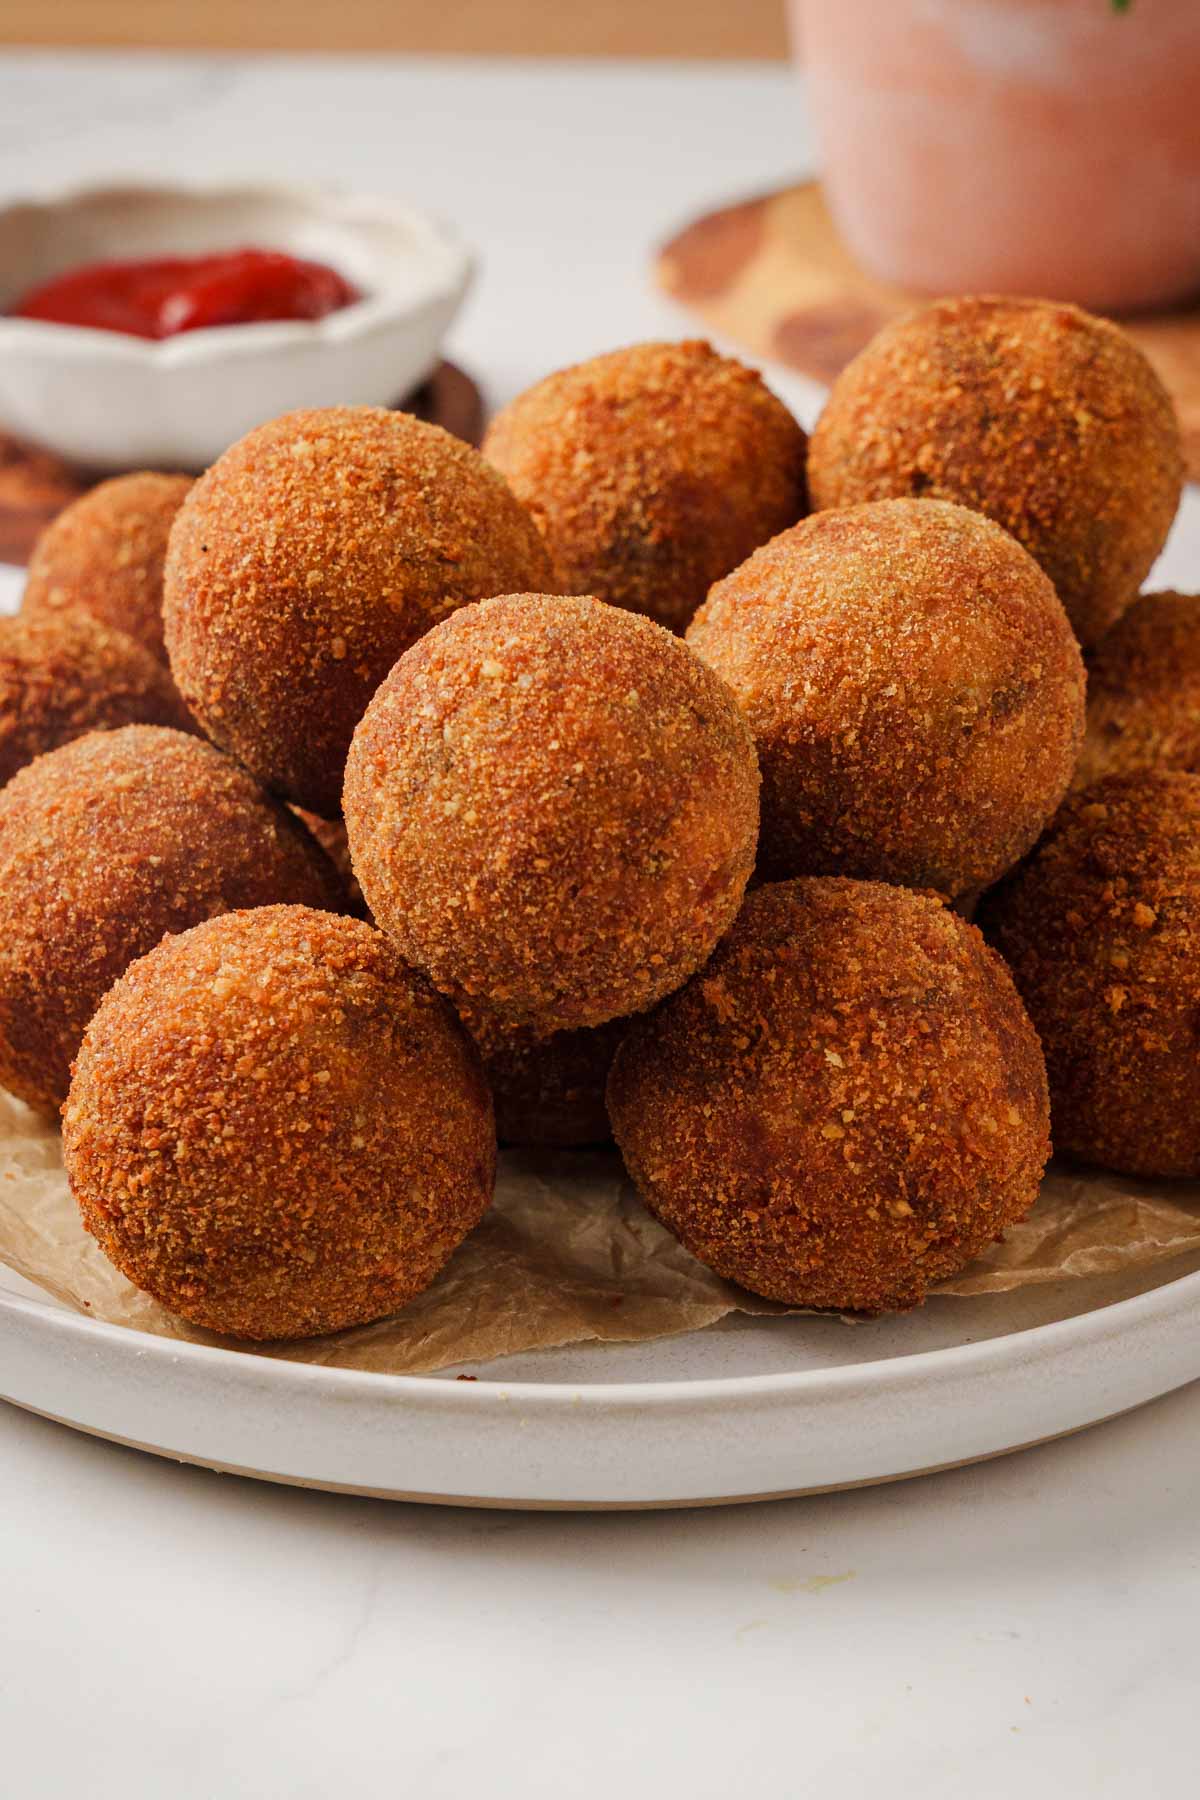
Step 4 – Fry Until Golden
Heat oil to 165-170°C (330-340°F) and fry in batches for 3-4 minutes, turning until deep golden all over. Drain on paper towels or a rack and serve hot.
How to Stop Your Cutlets From Cracking
Let’s talk about the number one problem beginner cutlet makers face: cracking. Here’s what’s actually happening – when a cutlet hits hot oil, the moisture trapped inside heats up and turns to steam. That steam needs somewhere to go, and if your breadcrumb coating has any weak spots, it will force its way out and blow the cutlet open from the inside.
The fix isn’t one single thing. It’s a combination of small things across every stage. Here’s what I’ve found out by testing countless fish cutlets:
- Dry your potatoes properly. After boiling and draining, leave them in the warm pot for a few minutes so the residual heat evaporates the surface moisture.
- Cook the filling until it looks dry. After adding the potato to the pan, keep stirring on medium heat for another minute or two. You want the mixture to look cohesive and dry, not wet or glossy.
- Use less onion than you think. Onion holds a lot of water. I consistently get better results keeping it on the lower side or skip it completely.
- Cool completely before shaping. Warm filling is soft and sticky and won’t roll into a tight, firm ball. Room temperature at minimum.
- Flour before egg – but shake off the excess. A light flour dusting helps the egg wash grip, which means the breadcrumbs actually stick. Just make sure you shake off any clumps, otherwise you’ll end up with raw floury patches under the crust.
- Double dip for a thicker crust. After the first round of breadcrumbs, go back through the egg and breadcrumbs again. A thicker crust is much harder for steam to break through.
- Get the oil temperature right. Too hot and the outside burns before the inside heats through. Too cool and the cutlets absorb fat and slowly split. Dip a wooden spoon in and if the oil bubbles round it – that’s the right temp.
- Fry in small batches. Overcrowding drops the oil temperature, which means the cutlets sit in cool oil and absorb more fat before the crust crisps up.
- Don’t flip too early. Let a crust form on the bottom before you turn them. Flip too soon and the coating can tear right off.
- Don’t fry from frozen. Always thaw cutlets overnight in the fridge before frying. Straight from frozen causes a drastic temperature difference inside the cutlet and almost guarantees cracking.
- Shallow frying? Make flat patties instead. Round balls need full submersion to cook evenly. If you’re shallow frying, flatten the filling into disc shapes so both sides cook properly.
Even with all of this, you might still get the odd crack here and there. That’s completely normal – it happens to everyone, including me. A cracked cutlet still tastes absolutely delicious. Just eat it first while you’re frying the rest. Cook’s privilege. 😄
Air Fryer Fish Cutlets
Just like my Air Fryer Ravioli, fish cutlets work in the air fryer if you want a lighter version without the deep frying. You still get a golden, crispy exterior – just without the oil bath.
The key is to be generous with the oil spray. Give each cutlet a good coating on all sides before they go in.
Spray the shaped and breaded cutlets generously with oil and air fry at 380°F for about 10 minutes until golden and crispy. No flipping needed. Every air fryer runs a little differently, so keep an eye on them towards the end and add a minute or two if needed.
DID YOU MAKE IT? Please leave a comment and rating letting us know how you liked this recipe!
Recipe
Sri Lankan Fish Cutlets That Doesn’t Crack!

Ingredients
Filling:
- 1 can mackerel drained
- 3 potatoes medium
- 1 tbsp oil for sauteing
- ½ onion very finely chopped
- 2 garlic cloves minced
- 1 inch fresh ginger minced (or 2 tsp ginger garlic paste)
- 2 green chillies finely chopped
- ½ tsp chilli powder
- ½ tsp turmeric powder
- ½ tsp freshly ground black pepper
- ½ tsp salt taste and adjust
- 1 tsp lime
Breading:
- ½ cup flour for dusting
- 2 eggs lightly beaten
- 1 cup breadcrumbs
- oil for deep frying
Instructions
- Boil Potatoes: Boil potato chunks in salted water until just fork-tender, about 15-18 minutes. Drain immediately and leave in the warm pot for a few minutes so the residual heat dries them out. Peel and mash until smooth.
- Clean the mackerel: Drain the can thoroughly, pressing out as much liquid as possible. Remove large bones and the dark slimy skin. Small soft bones are fine – they'll break down during cooking.
- Cook the filling: Heat a drizzle of oil over medium heat. Saute onion until soft (3-4 min), then add ginger and garlic paste and cook 1 minute. Add mackerel and break it down with a spoon. Add chilli powder, turmeric, black pepper, and green chillies – stir and cook 2 minutes. Fold in the mashed potato, squeeze in lemon juice, and taste for salt. Keep on the heat for another 1-2 minutes, stirring, until the mixture looks dry .
- Shape: Roll 2 tablespoons of cooled filling at a time into firm, smooth balls with no surface cracks. Place on a tray.
- Bread: Set up three bowls – flour, beaten egg, breadcrumbs. Coat each ball: lightly in flour (shake off all excess), then egg (let excess drip), then breadcrumbs (press firmly so there are no bare patches). For extra crack protection, double coat by repeating the egg and breadcrumb step a second time. You can chill the cutlets in fridge for about 10 minutes to firm them up.
- Fry: Heat enough oil to fully submerge the cutlets to 165-170°C (330-340°F). No thermometer? Dip a wooden spoon in – steady small bubbles means it's ready. Fry in batches for 3-4 minutes, turning until deep golden all over. Don't overcrowd the pan. Drain on a paper towels and serve hot.
Notes
- Dry your potatoes properly after boiling – residual moisture is the most common reason cutlets crack.
- Chop onions and chillies as finely as possible.
- Don’t skip chilling the coated cutlets before frying. 10-20 minutes in the fridge makes a real difference.
- Double coat for extra crack protection – especially recommended for beginners.
- Egg replacer for the breading – a thick flour-and-water slurry works as an egg substitute. Mix 2 tablespoons of plain flour with 3 tablespoons of water until smooth and use it exactly as you’d use the beaten egg.
Storage
- Fridge (unfried): Coated cutlets will keep refrigerated on a tray for up to 24 hours before frying.
- Freezer (unfried): Freeze on a tray until solid, then transfer to a freezer bag. Keep for up to 2 months. Thaw in the fridge overnight before frying. Do not fry from frozen.
- Fridge (cooked): Store cooked cutlets in an airtight container for up to 3 days.
- Reheat: Oven or air fryer at 180°C (350°F) for 8-10 minutes.