Ninja Creami Vanilla Ice Cream
Make creamy vanilla ice cream in your Ninja Creami without pudding mix! This easy recipe uses sweetened condensed milk and heavy cream for a delicious and irresistible homemade ice cream.

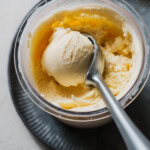
Vanilla Ice Cream in Ninja Creami
I hesitated to buy a Ninja Creami for so long, but I finally invested in one this summer. It was the best decision for our family since we’re big-time ice cream lovers! It’s so exciting to see exactly what goes into our ice cream and have fun experimenting with different recipes and flavor combinations. It’s become the most beloved gadget in our kitchen, right after my air fryer.
I’ve experimented with several vanilla ice cream recipes, including the one in the Ninja Creami booklet using cream cheese and those with pudding mix. But I always find myself returning to my tried-and-true recipe which I first learned at Bigger Bolder Baking. This version uses condensed milk, which gives the ice cream that rich, creamy texture and taste we all love—just like store-bought or traditional ice cream.
Plus, this ice cream base is fantastic for endless flavors and combinations. I’m listing below some of the mix-ins that you can add to this vanilla ice cream to make it an even better treat.
I’ve also made chocolate ice cream and strawberry ice cream in my Ninja Creami that tastes just like the real deal. I’m sure you’ll love it!
Just a heads up, when using the Ninja Creami, it takes about 15 to 24 hours from the time you make the ice cream mixture until it’s frozen solid and ready to churn and eat.
Ingredients you need
*Scroll below for the complete ingredient list, measurements, and printable recipe card.

- Heavy whipping cream: Look for 35% fat content—this is what gives the ice cream that rich, smooth, and luxurious feel.
- Sweetened condensed milk: It gives both sweetness and a creamy texture, so you don’t need any extra sweeteners like sugar.
- Full cream milk: I used whole milk for a nice balance of creaminess. You can also use skim milk or 2% if you prefer.
- Vanilla extract
How to make vanilla ice cream
*Scroll below for the printable recipe card for full list of ingredients and instructions.

Making ice cream in the Ninja Creami is super easy. Just whisk all your ingredients together until they’re well combined.
Pour the mixture into the Ninja Creami containers and freeze for 15 to 24 hours. I’ve even done just 8 to 10 hours and still got perfect ice cream.
When you’re ready, close and pop the container into the machine bowl, select the “ice cream” function, and let the Ninja Creami work its magic!

If the ice cream turns out crumbly, you can use the “re spin” function, but with a condensed milk base, I’ve found it’s usually not necessary.
The machine might make a bit more noise with a condensed milk base, but it’s nothing to worry about.
You can also use one or two tablespoons of milk with the “re-spin” setting to make it extra creamy.
Scoop the ice cream into bowls, add as a topping for your favorite desserts, or enjoy right from the tub.
Storage
You can store any leftover ice cream in the freezer. Just make sure to level the top so it’s ready to be processed again if needed. When you want to process it again later, just use the “ice cream” function one more time.
Tips for your Ninja Creami ice cream
- Fill only to the Max line to avoid overfilling and ensure everything processes correctly.
- Freeze the container on a flat surface so the mixture stays even and smooth.
- Freeze without the lid to prevent any bumps from forming on the surface.
- If there are any bumps or uneven areas on the top, use a knife or spoon to level them out before processing.
- Let the ice cream sit at room temperature for about 10 minutes before churning for the best results.
- If you see ice crystals on the edges, run the container under warm water to smooth them out.
Mix-ins for your ice cream
One thing I love about making ice cream at home is how many different flavors and combinations you can play around with. Here are some ideas to get you started, but don’t limit yourself—get creative and have fun!
To add mix-ins, once you process your ice cream base, make a hole in the middle with a spoon, and drop your mix-in. Close and secure the container in the machine. Press “Mix-in” to process.
- Cookies and cream: Add 2 to 3 crushed Oreos.
- Chocolate chips: Add one to two tablespoons of chocolate chips.
- Strawberry: fresh or frozen strawberries, chopped
- Sprinkles
I wouldn’t recommend adding peanut butter or sauces like caramel or fudge as mix-ins. With the way the Ninja Creami works, they tend to blend right into the ice cream instead of creating those nice swirls you get with traditional ice cream making methods. It’s better to use them as toppings when serving!
If you make this recipe, don’t forget to leave a comment and rating below. We love to hear from you!
Recipe
Ninja Creami Vanilla Ice Cream

Equipment
- Ninja Creami
Ingredients
- ¾ cup Heavy whipping cream
- ¾ cup Milk
- ½ cup Sweetened condensed milk
- 1 tsp vanilla extract
Instructions
- Whisk all the ingredients together in the Ninja Creami container.
- Freeze the mixture for 15 to 24 hours.
- If needed, let the mixture sit for a few minutes at room temp or run it under warm water to make it easier to process. Smooth out the top if there are any bumps on the mixture.
- Place the container in the machine and select the “ice cream” setting. For an extra smooth texture, place the container back in the machine and use the “respin” setting.
Can I use the soft serve swirl with this base ? It’s so good
I haven’t tried it myself, but I think you could use this base and add more milk to make a soft serve.
Thanks so much for this recipe! My whole family loved it and it was a great intro into using our new Creami.
That’s awesome Brittany! Thank you.